Wednesday, April 16, 2014

Lego Party Results

We have just been so busy that I haven't had time to post all the rest of the Lego Stuff!

So, this is just going to be a bunch of pictures, pretty much.
Here we go!

 Here are the invitations that we sent the week prior
See my previous posts for the link of where to download this.

 These were all the print outs I made.
See my previous posts for links of where to download all these.
 I ordered this awesome piñata online (Etsy)
The person who made it did a great job. It was EXTREMELY sturdy. It took everything all the kids at the party had to bust it open. 

 I made these with the molds that I got on Amazon.
They were a bit challenging to work with at first since I wasn't used to working with candy molds.
Once I got the hang of it, they turned out great.
This was the games table. We had the favor bags (which were great for putting all the candy and toys from the piñata inside), treat boxes (which were used for the interlocking lego candy we got from Amazon), the maze, the word search, coloring pages, crayons, face paint, a lego head for decoration, and legos shaped to say "Dane" and "8" (his name and age).

 Here are the water bottles again. The kids thought they were awesome and even took some of the empty bottles home with them.

 I only did a handful of these. I used sharpie on plates.

Here are the party favor bags again. I just bought the bags and cut out a bunch of circles. Next time I do a project like this, I am buying a paper punch. I found one AFTER I spent hours making these and had hand cramps from cutting all the little circles.
Inside the bags were little party favors from Party City. There were little airplanes, bouncy balls, and compass rings. Nothing really Lego themed since Party City apparently doesn't carry anything "Lego".

 These were just covered juice boxes. I had printed Lego brand looking circles from online somewhere, but they ended up being took big for these little juice boxes. If I had bought the slightly bigger (and of course, more expensive) ones, then the print outs would have worked. Instead, I had to draw them on myself, which the kids didn't care either way.

 These were the sugar cookies made with the Lego cookie cutters ordered from Amazon.
Instead of spending time decorating them myself, I left out icing in several different colors for the kids to decorate their own lego people. This was totally a hit. We had a few icing accidents, but that's no biggie and easy to clean up. Letting them decorate their own saved me time and occupied the kids at the party for a bit.

 This was the cake. It was my first time making a cake, so I know its not awesome. I had bought what I thought was fondant sheets, and it ended up being edible paper sheets. I was not happy. Good thing was that I had some tub icing that I used and used spray icing to decorate the sides. My kiddo loved it. I also used the lego candy bricks and lego candy people that I made with the molds to decorate it. Unfortunately, the icing bottle that I used to write "Happy Birthday" came out in spurts and looked awful. I swear, I am way better at writing with icing then this, but it was already on the cake, so I just had to leave it.

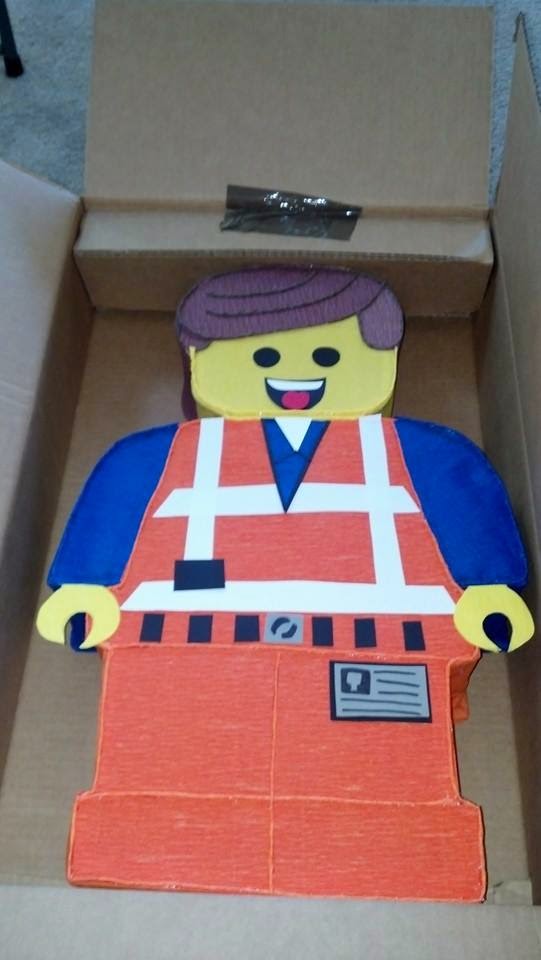
 I made a Lego Emmet photo booth board. The kids had a great time putting their face in and letting their parents take photos. The adults had fun with it too, so it was a mega win! I used a projector to put the image on the board and trace it, then painted it with acrylic paint and outlined it in sharpie. This was the thing I was most proud of, mostly because when my son saw it he told me I was the "best mom ever" (which is what every mom wants to hear).

 Marshmallow pops. I followed steps online. (Don't have the link right now- just google it and tons of options come up) I used sticks to make the heads with a large marshmallow and a small marshmallow, then covered with yellow candy coating. Once it was hardened/dry, I used a candy marker to make the faces. I put them in a piece of styrofoam to dry, then decided it looked good as a display and left them like that for the party.

 These were the cupcakes. I used the same cake mix as the main cake. I covered the tops with spray icing then added mini M&Ms and the candy lego men from the molds.

 Here's another photo of the treat boxes that I printed and cutout and shaped. Also in this photo is the thank you cards that went in the party favor bags.
Here is how the food table looked.
We had tons of food even though I didn't have many RSVPs. It ended up being a good thing since a bunch of people showed up! Always a good thing to plan for extra.

Wednesday, March 26, 2014

Lego Theme Party Progress 1

After all my internet scouring, I have a few things completed.

Let's start with the invitations.
I found a free photo to edit for movie ticket style invitations and envelopes.
I am buying a new printer today (since mine is broken) so I can print them and give them to my son to pass out to his classmates.

Here is the link for where I found the invitation:

http://www.rookno17.com/2014/01/free-printable-ticket-style-party.html

Here is how mine turned out:


The other files I have are for games and thank you cards.
I found them all on http://halegrafx.com


I also ordered:

Lego candy blocks here http://www.amazon.com/gp/product/B0000DJT3C/ref=oh_details_o00_s00_i00?ie=UTF8&psc=1

Lego silicone molds here http://www.amazon.com/Building-Bricks-Minifigure-Candy-lovers/dp/B007MJFVJM/ref=pd_bxgy_gro_img_z

Lego Cookie Cutters here http://www.amazon.com/gp/product/B002P65I4A/ref=oh_details_o01_s00_i00?ie=UTF8&psc=1

I just hope that they come in on time.
When I ordered, it said only 3-5 days, but it didn't show the processing times for the orders.
After I placed the order, it said that arrival times were April 1-16. His party is the 12th.
Fingers crossed that they all arrive on time.

Tuesday, March 25, 2014

Lego Theme Party Research

Whew!
I just spent an hour looking for Lego Party ideas.

My son finally decided on a theme: Lego!
But, not just any lego- from the Lego Movie

The only challenge is finding anything specific to that movie characters.
I found lots of great ideas on the below links (if you need to research)
And, I pinned a lot on my Pinterest.

I will work on some invites tonight and finalize what we are going to do for everything.

So far what I like includes:
fondant lego cake
lego party favor bags
lego plates
using legos for display plates and containers for silverware
lego rice kris pies
lego character cookies (ordered cookie cutters already)
lego photo op cardboard cutout

I will be scouring and deciding soon, so look for more fun posts on Legos!


http://www.toppartyideas.com/top-lego-party-games/
http://projectmommie.blogspot.com/2013/01/a-lego-race-car-5th-birthday-party.html
http://mydesigndump.blogspot.com/2010/01/lego-party.html
http://www.deliacreates.com/2011/02/lego-brick-favor-boxes-and-free.html
http://www.andersruff.com/custom-printable-parties/birthday-parties/part-3-modern-lego-inspired-party-games-and-activities/
http://www.livinglocurto.com/2010/06/lego-cake-pops/#sthash.dL2PV65O.dpbs
http://laurellanecrafts.com/2013/10/29/lego-birthday-party/

Sunday, March 23, 2014

Night stands to bring the bedroom together

This weekend's project was nightstands!

Let me start with the fact that we really don't have too much in the way of furniture.
We have the basics and that's about it.
We never really had money and we never really saw the need to spend money on things.

But, since I am home all day, I thought I would work on our house piece by piece.

A while back, I made my own vanity station to help organize all my bathroom stuff and clear up some clutter.
See the post here:
http://yourjillofalltradeshome.blogspot.com/2014/02/a-project-day.html

This weekend, I grabbed some nightstands at Ikea and put them together.


I think they look lovely.
They were simple to put together (even though the directions looked very daunting when I first opened them). The first one took me about 45 minutes, but the second one only took about 20 minutes.

My hubby and I have this going joke.
Everything I have ever put together has fallen apart.
I put together the vanity table and now these nightstands.
My hubby has bets to see how long it takes for them to fall apart.
I hope that doesn't happen.


In addition to the nightstands, I was going to make my own canopy bed out of PVC pipe and homemade curtains. However, my hubby was opposed. I think he doesn't want it to look too girly in our room.
We shall see if I win the debate with my hubby to make it happen....

Here is a link for an idea of what I was going to do:
http://www.apartmenttherapy.com/tracey-robs-beach-oasis-house-tour-191606
http://www.diy-guides.com/making-a-canopy-for-a-bed-canopy-parts/
http://www.simplifiedbuilding.com/projects/help/ (photo for idea is about halfway down the page)

Thursday, March 20, 2014

More Monsters Inc Theme Baby Shower Stuff and More

Wow.
I kind of disappeared for a bit.
Haven't really posted much.

I had a busy bit with family stuff and jazz.
We got our crib, mattress, swing, bouncer, humidifier, and a few other tidbits in the mail for the baby.
I wanted to go ahead and get all the big stuff early in anticipation for the next little monster on his way.

I added a few more items to the Monsters Inc Baby Shower games.
But, I also ventured into other Disney stuff.
I found two websites that had tons of Disney clipart so it made making things easy.
I bought a few more digital scrapbooking sets and started to go.

The biggest project taking up my time, though, is clearing out all the clutter in my house.
We started on the garage and made some progress there, but we have a long way to go.
That's pretty much what I will be doing with my time: cleaning clutter and getting the house ready for the baby.

Another thing coming up that I need to get ready for is my son's 8th birthday.
He wants to do a party at the house with a bounce gym thing.
I need to find some pricing and info and make invitations for his party also.
He just needs to give me a theme for the invitations so I can make them.
I also realized that I need a new printer to print all these things out for the parties.
Mine prints white lines through everything.

So, not much else for an update, but here are some links and photos.

Here are the websites if you want to get your own clipart:
http://www.disneyclips.com
http://disney-clipart.com
http://www.wondersofdisney.webs.com/disfriends/disfriends.htm

Here are photos of what I created so far (in addition to the ones from the previous post):

 The Price is Right Game
Water bottle labels
Frozen Cards

Sunday, March 9, 2014

Monsters Inc Theme Baby Shower

Now that my gender reveal party is over, I was looking for my next project.
Next, of course, is the baby shower.

Since I do not have someone to throw it for me, I am doing it myself (just like with the gender reveal party).
I thought about it for a few days trying to think of a theme. I was not sure what I wanted to do since I was having another boy vs having a girl (I had tons of really cute ideas for a girl- but girl themes and such seem so easy).
One day, I mentioned to my hubby that we were having another "monster" (since our other two boys are such terrors at times), and, then, it hit me!

I started with the invitations and began googling ideas.
The first place I found was a website where she took another lady's idea and made it her own with a Monsters Inc theme.
http://www.sandrafiorella.com/2013/08/making-my-own-baby-shower-invitations.html
So, I used her same idea of starting with the pdf from the other lady's website then adding the baby monsters at the bottom.
However, I did not want the balloon idea. I just wanted to write the info myself.
This took some time and work.

I had to download some programs and such for my computer (I use a Mac- it would have been simpler for me to begin with if I had Windows, since that was what I was used to) to figure out how to make it work.
Once I got it all figured it out, I quickly learned how to use the program on my macbook and became amazed and fell in love with the program. IT WAS AWESOME!
Then, I just couldn't stop.

I googled other ideas from all over the internet and downloaded some digital scrap paper as well as some clip art of Monsters Inc characters. It took a lot of ground work, but once I got everything, it all just took off.

I ended up making invitations, baby registry info cards, diaper raffle cards, 5 games (Baby ABCs, BINGO, What's in Your Purse game, Word Scramble, and Word Search), and 2 types of Thank You cards. The results were so darn cute that I just couldn't keep them to myself!

So, here are photos of the cards (with a watermark on it so as to deter anyone from just taking them).
Hope they are as awesome as I think they are.
And, just so you know, I am very proud of the work I did. I am not super computer savvy, so when I see these I get excited since it does look like I know what I'm doing.


Saturday, March 1, 2014

Gender Reveal Party with Results

Today was our gender reveal party.

I made lots of fun stuff for the party and we had a great turnout.
The best turnout I have ever had.

Here was what we did for food and fun!


We had a table set up by the door with all the games
We had tickets (not in the pic above) for gender voting. A ticket was drawn from the winning gender jar for a trophy. We were going to do gift cards, but I forgot them when I was at the store.
We had a Wives Tales Predictions poster to show what all the old wives tales were saying to help with voting.
We also had badges (close up pic below) to wear ties or tutus to support their team.
Next, there was 2 small baby bottles with sixlets inside for guessing the number of candy inside. They placed their vote in the jar behind that one.
Last on the table was the gender tree to put their mark for their vote and a sharpie with their name. A way for them to "leaf" their print.
Hand santizer was there in case they needed help getting the ink off their hands

Close up of the badges
Made with craft foam and shirt pins from Michaels (in the jewelry section)

 Close up of the Old Wive's Tales Predictions poster with results circled.

 Close up of the finished gender tree.
We had in person votes and virtual votes since we have lots of family and friends out of state who could not be there for the party, but still wanted to be included.

We decorated the archway between the living room and kitchen with streamers and balloons.

In the kitchen, we put together all the food (pictured above).
We ordered a medium assorted sandwich tray from Kroger. The sandwiches were very tasty.
We picked up a fruit tray, veggie tray, and a cheese and cracker tray from Walmart.
We also grabbed 3 types of chips and 2 types of dip to add to the table.
The rest of the table was all the treats and favors that we made or bought.
I made cupcakes, rice crispy treats with candy coating, and cookies.
The favors included decorated (by me) Hershey bars, pink and blue rock candy, pink and blue swirl lollipops, pink and blue peeps, pink and blue marshmallows, and favor bags with mints inside.

 Here is a close up picture of the cookies.
The flavors were pink lemonade and blue raspberry.

 Here is a close up progress pic of the Hershey bars.
They were covered in sharpie to decorate.

 Here is a close up of the cupcakes before I put them on the platter for the party.
They were yellow cake with pink and blue frosting with pink and blue sprinkles.

 This is a close up of the Rice Krispie treats.
It was one serving/recipe split between 2 pie pans. 
Then, I added pink and blue candy coating and icing.

 The drinks were Pink Lemonade and Blue Raspberry Hawaiian Punch

Here was the cake before the big reveal.
We ordered it from Oh La La! bakery in Katy.
They have 3 locations and their cakes are awesome.
You can pick the cake flavor, outside icing, and inside icing.
Ours was decorated inside to show gender.
We had the ultrasound tech put our gender card inside a sealed envelope and I dropped it immediately off to the bakery for them to know what color to dye the icing inside.
The cake was for 10 servings, but we got lots more than that.
The cake was huge (and heavy)! 
Made it worth the money, but we didn't need anywhere near that much cake.


And, here was the results!
Boy #3 for our family.
I lost the bet, but I will have lots of strong boys to protect Mommy when they get older.